• Welcome to Kart Racing Pro Official Forum. Please login or sign up.
 
April 20, 2024, 04:29:51 PM

News:

Please read the FORUM RULES


Show posts

This section allows you to view all posts made by this member. Note that you can only see posts made in areas you currently have access to.

Messages - Russell Hodgson

91
Plugins / Re: Z1 Dashboard Software
April 21, 2021, 11:46:25 PM
Z1 Software has partnered with AI Racing Tech, from the University of Hawaii - https://www.hawaiiavtech.com/home.  AI Racing Tech will be competing in the evGrandPrix at the Indianapolis Motor Speedway - http://evgrandprix.org/autonomous/.


The Z1 Software (Dashboard and Analyzer) are being used to hone the autonomous kart and its algorithms, allowing the team to be as competitive as possible in the event.

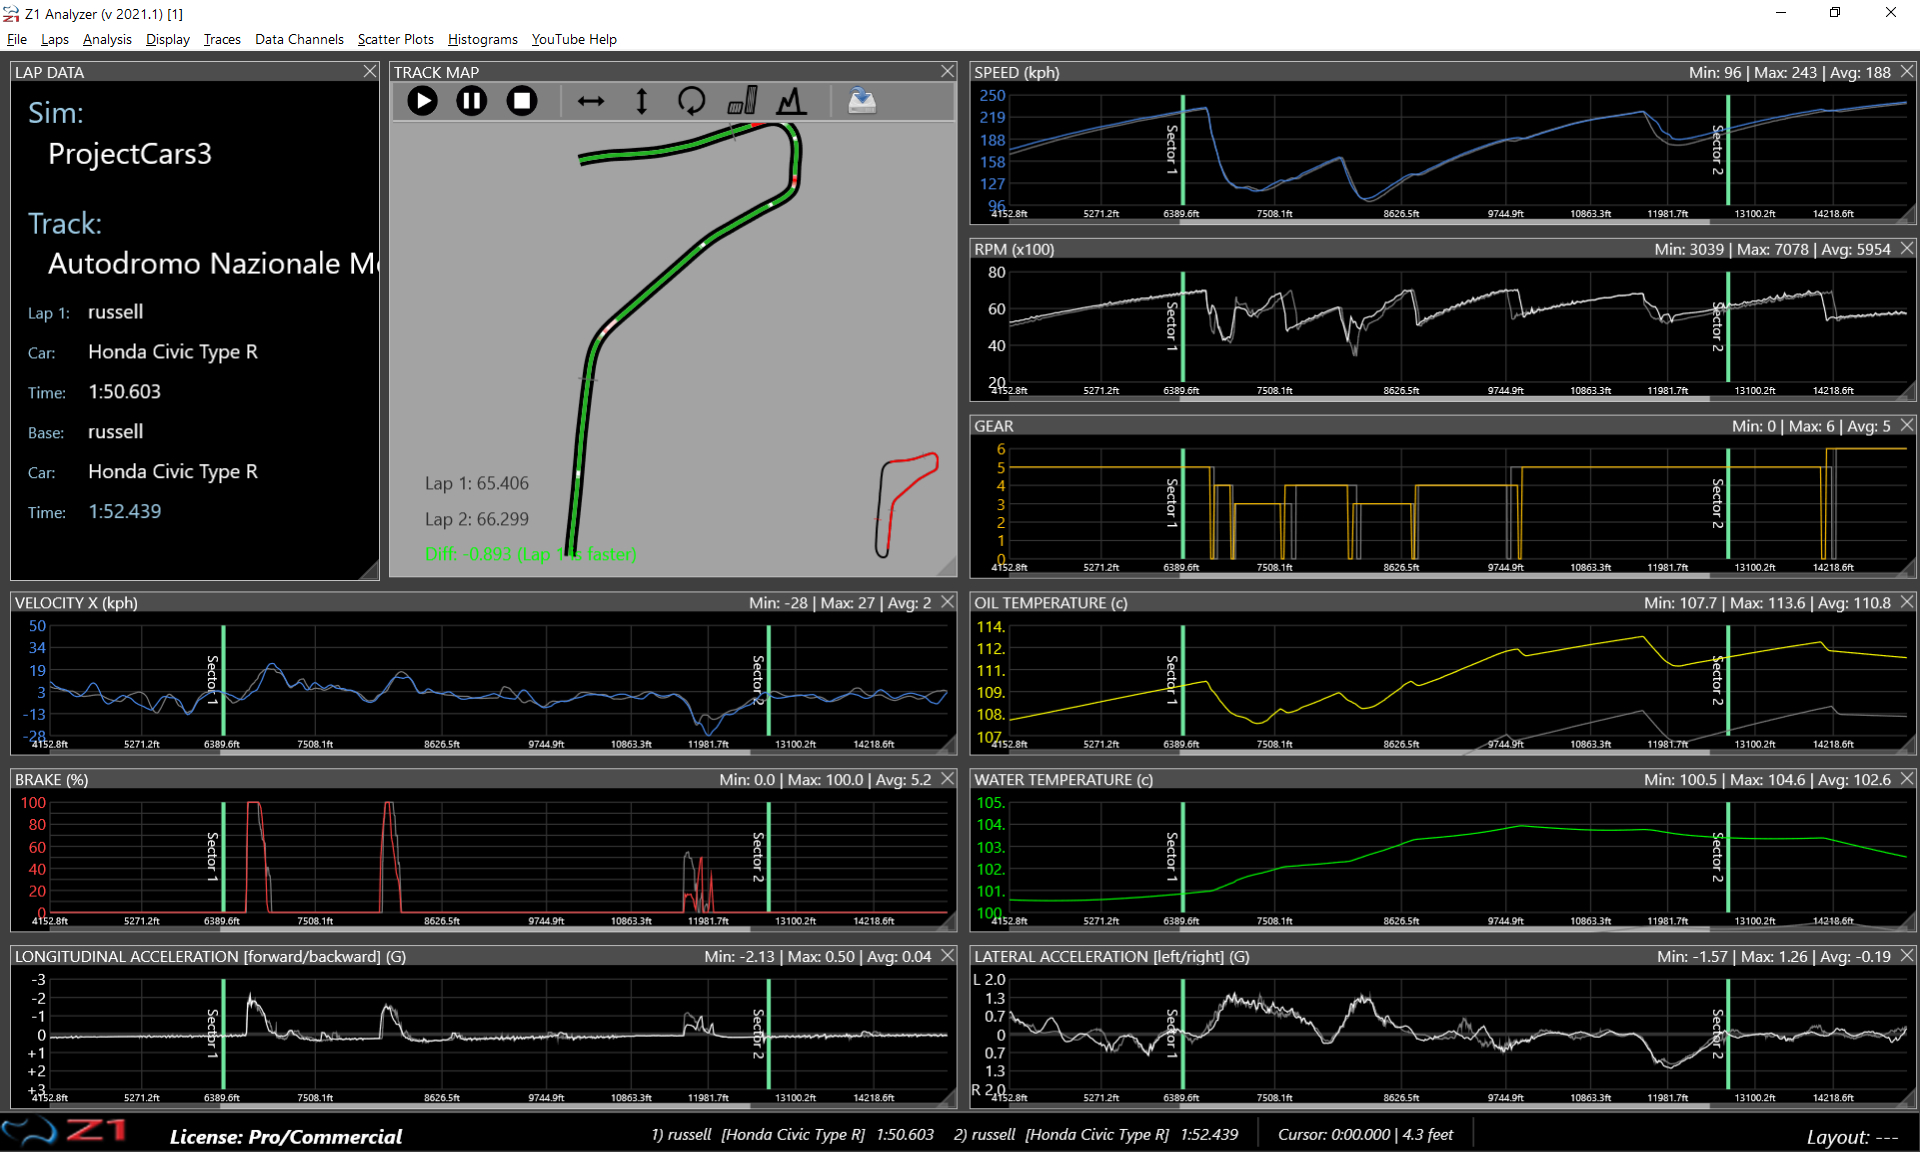
Make sure you check out both websites above. This is another example of how the Z1 Software works in both the sim world and the real world to improve lap times - in this case AI lap times!
92
Plugins / Re: Z1 Analyzer
April 16, 2021, 04:58:52 PM
Version 2021.1 of the Z1 Analyzer introduces some new and improved ways to zoom traces, scrub traces, and shift the base lap beacon in a trace.

This video explains how they all work, and how you can customize the controls used implement them.


Download the demo today: https://z1simwheel.com/dashboard/demo.cfm
93
Plugins / Re: Z1 Analyzer
April 14, 2021, 09:15:37 PM
We've just released version 2021.1.3 of the Z1 Analyzer.  This contains two bug fixes.

The first is associated with live telemetry in iRacing.

The second fixes an issue that could cause the Analyzer to become non-responsive in the Open lap dialog.


New users can get the demo here:
https://z1simwheel.com/dashboard/demo.cfm

Existing users can get the update here:
https://z1simwheel.com/dashboard/MyDashboard.cfm
94
Plugins / Re: Z1 Analyzer
April 11, 2021, 08:08:44 PM
We've released version 2021.1.2 of the Z1 Analyzer.

This fixes a bug that caused the Analyzer to crash if you used the mouse wheel to scroll the available laps in the Open Lap dialog.


New users can get the demo here:
https://z1simwheel.com/dashboard/demo.cfm

Existing users can get the update here:
https://z1simwheel.com/dashboard/MyDashboard.cfm
95
Plugins / Re: Z1 Designer
April 08, 2021, 04:49:37 AM
We've just released version 2021.1.1 of the Z1 Designer.  This includes a few bug fixes and some small updates.


* Fixed a bug where a layer would be deleted if you dragged it to the bottom of the list.

* Fixed a bug where layers would sometimes not get transferred between the foreground and background.

* Fixed a bug where the fill color for the multi-line tool did not save.

* Added 'Position' as an option in the Widget tool.

* Added 'Blue Flag', "Full Course Yellow', and 'Local Yellow Flag', as options within the Warning tool.

New users can get the update here:
https://z1simwheel.com/dashboard/demo.cfm

Existing users can get it here:
https://z1simwheel.com/dashboard/MyDashboard.cfm
96
Plugins / Re: Z1 Dashboard Software
April 08, 2021, 04:42:32 AM
We've just released version 2021.1.1 of the Z1 Dashboard.  This has a few updates.

* Improved the positioning of the Z1 Dashboard when it is closed near the edge of a monitor.

* Updates the Custom Dashes to work with version 2021.1.1 of the Z1 Designer.


New users can get the update here:
https://z1simwheel.com/dashboard/demo.cfm

Existing users can get it here:
https://z1simwheel.com/dashboard/MyDashboard.cfm
97
Plugins / Re: Z1 Analyzer
April 08, 2021, 04:36:14 AM
We've just released version 2021.1.1 of the Z1 Analyzer.  This has a couple of tweaks from version 2021.1.

* Improved the positioning of the Z1 Analyzer when it is closed near the edge of a monitor.

* Improved telemetry data reading when running single hot laps in sims.


New users can get the demo here:
https://z1simwheel.com/dashboard/demo.cfm

Existing users can get the update here:
https://z1simwheel.com/dashboard/MyDashboard.cfm
98
Plugins / Re: Z1 Designer
April 06, 2021, 11:08:21 PM
Here's the first of our how-to videos for the Z1 Designer.  This video provides a general overview of the various features of the Z1 Designer to help get you started.


If you want to jump to specific section:
Z1 Designer Into: 0:50
Dashboard Properties 2:47
Object Properties 3:48
Layers: 5:43
Warning Objects: 8:58
Design Window: 10:32
Toolbar: 14:02
Dashboard Defaults: 17:31
Dashboard Shift Lights: 18:35
Final Thoughts: 20:15
99
Plugins / Re: Z1 Dashboard Software
April 02, 2021, 01:00:55 AM
Here is round 4 of the PCA Sim Racing league. Z1 Software is proud to be a sponsor of this event.  The race is at Sebring.  Skip to about 10 minutes in for the beginning of the broadcast.


Download the Z1 Software demo here:
https://z1simwheel.com/dashboard/demo.cfm
100
Plugins / Re: Z1 Analyzer
March 31, 2021, 07:22:45 PM
Version 2021.1 of the Z1 Analyzer is now available!  This version has loads of new features and improvements.

You can now display as many traces, data tiles, scatter plots and histograms at once as you like.
(Previous versions limited this to 9 traces, 20 data tiles, 8 scatter plots and 4 histograms.)


There is now an option to delete your laps in the Open lap Dialog.


Menu options for traces, data tiles, scatter plots and histograms have been standardized so they all work in the same way regardless of the type of object.


New Data Channels: Wheel lateral patch velocity, Wheel longitudinal patch velocity, Wheel lateral ground velocity, Wheel longitudinal ground velocity, Wheel toe, Velocity X, Velocity Y, Velocity Z, Brake Bias, ABS Setting, Traction Control 1 Setting, Traction Control 2 Setting, Front Anti-Roll Bar, Rear Anti-Roll Bar, Left Weight Jacker, Right Weight Jacker, Differential Entry, Differential Middle and Differential Exit are now available as data channels.

You can now 'scrub' a trace by moving the mouse with the control button.
You can now use the mouse wheel to zoom in and out on a trace.


The External Data Import now supports the Porsche PCM data format.


The new Control settings tab lets you customize mouse controls.


New users can get the demo here:
https://z1simwheel.com/dashboard/demo.cfm

Existing users can get the update here:
https://z1simwheel.com/dashboard/MyDashboard.cfm

Here is the full list of release notes:
* You can now display as many traces, data tiles, scatter plots and histograms at once as you like. (Previous versions limited this to 9 traces, 20 data tiles, 8 scatter plots and 4 histograms.)

* Menu options for traces, data tiles, scatter plots and histograms have been standardized so they all work in the same way regardless of the type of object. See below for more details.

* Popup menu updates - when using the popup menu on traces, data tiles, scatter plots or histograms, they will all now have options to maximize, restore, and close the object.  This is under the popup's 'Trace Display' option for traces; 'Data Tile Display' for data tiles, 'Scatter Plot Display' for scatter plots, and 'Histogram Display' for histograms.

* All objects (traces, data tiles, scatter plots, and histograms) can now be changed using their popup menu. Right click on the object to view the popup menu. You'll then see various options for selecting the type of data displayed by that object.  For traces and data tiles there are multiple sub-menus.  For scatter plots and histograms there is just one sub menu.

* All objects (traces, data tiles, scatter plots, and histograms) are now added in the same way.  There is an 'Add...' options under each main menu.  Choosing this displays a sub-menu of the available objects that can be displayed.  For example, the 'Traces->Add Trace' menu option shows all available traces that can be added; 'Data Channels->Add Data Tile' shows all available data tiles that can be added. 'Scatter Plots->Add Scatter Plot' shows all available scatter plots that can be added. 'Histograms->Add Histogram' shows all available histograms that can be added.

* All currently displayed traces, data tiles, scatter plots, and histograms now appear under their main menu.  Selecting one of these from the menu option will bring that object to the foreground and highlight it in a teal color.  For example under the Traces menu by default you'll see traces 1-9 displayed. If you select one of those options that trace will be displayed on top of all other objects and highlighted. This is the same for data tiles, scatter plots and histograms.  This makes it easy to find objects.

* All objects are now closed by either clicking on their close icon, or by right clicking and choosing the close option.

* You can close all of the same type of object by choosing the 'Close All...' menu option under the appropriate main menu.  For example to close all currently displayed traces choose 'Traces->Close All Traces'.

* Improved the speed of the lap scan process.

* When re-opening the video display, the previously loaded video will remain displayed.  (In previous versions you had to reload the video every time you opened the video display.)

* When moving or resizing any object (traces, scatter plots, etc) that object will redraw as you move it.  Previously only the green outline was drawn, with the actual object not being updated until you finished moving or resizing the object.

* When changing your language setting from the General settings tab, the menus will now update as soon as you exit the Settings dialog. In previous versions you had to restart the Analyzer for the change to take effect.

* Added additional translated items - the popup menus on the traces, data tiles, scatter plots and histograms are now translated into the appropriate language.

* There is now a "Delete Lap" option in the Open lap dialog. Right clicking on a lap in the Local Laps section display the popup menu.  The bottom option is the "Delete Lap" option.  This lets you delete the selected lap.  Deleting a lap will remove its file from your hard driver and prevent it from being recreated during future lap scans.  Note you can only delete local laps, and not server laps.

* New Data Channels: Wheel lateral patch velocity, Wheel longitudinal patch velocity, Wheel lateral ground velocity, Wheel longitudinal ground velocity, Wheel toe, Velocity X, Velocity Y, Velocity Z, Brake Bias, ABS Setting, Traction Control 1 Setting, Traction Control 2 Setting, Front Anti-Roll Bar, Rear Anti-Roll Bar, Left Weight Jacker, Right Weight Jacker, Differential Entry, Differential Middle and Differential Exit are now available as data channels.  They can be selected for a standard trace, custom trace, data tile, math channel, scatter plot or histogram.  See this page for which sims supports these new data channels: https://z1simwheel.com/analyzer/channels.cfm

* The Laps->Pause Lap menu option has been replaced with a 'Play/Pause Lap' option.  This will toggle between playing and pausing the lap playback at the currently selected playback speed.  The space key is the shortcut for this function.  The Play Lap option still plays the lap, and slows it down by half every time it is clicked.  The Stop Playing lap menu option stops playback and resets the playback speed to 1/1.

* You can now 'scrub' a trace by moving the mouse with the control button.  So control-click the left mouse button and then drag the mouse with the control button held down, and the cursor will follow you on the trace, displaying the appropriate data on all traces, data tiles, and scatter plots.

* You can now use the mouse wheel to zoom in and out on a trace.

* There is a new tab in the settings dialog called 'Control'. This lets you specify how certain controls work within the Z1 Analyzer.  For this version, you can specify what the mouse drag option does within a trace. You can specify what a basic mouse drag does, what a control-mouse drag does, and what a shift-mouse drag does.  The three options are 'highlight/zoom the trace', 'scrub the trace', or 'shift the base lap'.  (Note the shift base lap functionality requires a Track license or higher.)

* Trace scrollbars - If you are zoomed in on a trace then a scrollbar will appear at the bottom of all displayed traces.  You can use this to scroll through the entire trace at the current zoom level.  The color of this scrollbar can be set in the Screen Colors tab of the settings dialog.

* Updates to the Screen Colors and Print Colors settings tabs to include more customizable color options.

* Import External Data Dialog - you can now use the Tab key to move between the five text fields in the Enter Lap Information section.

* Import External Data Dialog - there is now a Separator drop down to the right of the Select File browse button.  This determines the separated used when parsing the imported data.  By default it is set to 'Automatic' and the Analyzer will attempt to determine the separated being used.  However if the data does not display properly in the preview, then you can try selecting a specific separator from the drop down.  The currently supported options are comma, pipe and semi-colon.

* Import External Data Dialog - there is now a Hertz option drop down. This is located to the right of the Mappings options. This hertz option lets you specify the hertz for each row of the file. This is useful if the file to be imported does not include data on the current session time. By default the hertz value is set to 'From File'.  This default setting uses whatever is specified in the file column assigned to the Current Session Time. Most of the time this will be sufficient.  However some files may not include data in the current session time, in which case you will have to assign a hertz value to the file.  A setting of 1 hertz means each row is a second.  A value of 60 means each row is 1/60th of a second. The hertz value is saved with the mapping.

* Import External Data Dialog - the import process now recognizes lap data created by the Porsche Sport Chrono PCM. There are two pre-defined column mappings for this data, 'Porsche PCM - Imperial', and 'Porsche PCM - Metric'. You first need to export the data from the Porsche PCM to a csv file.  Then select that csv file to open in the Import External Data Dialog. The Analyzer should auto-recognize the format.  If it does not then you should select the semi-colon separator. Then control click on the column names row (usually the second row).  Then click on the first data row (usually the third row).  Then Load the Porsche PCM mapping, either the metric or imperial depending on your data.  Then click the Import button.

* Track Edge Check Analysis Screen - There is now a button to redownload the track edge from our servers.  Track edges are downloaded automatically when you open a lap (if the track edge exists on our server).  As you can flip or rotate the track edges using the icons on the track edge check analysis screen, there may be a situation when you accidentally adjust the track edges to a state where you can no longer get them to line up with the track map.  The solution is to redownload the track edge.  Clicking this new button will redownload the track edges.

* Automobilista 2 is now officially supported.  To connect to this sim turn on the Shared Memory option within Automobilista 2, and set it to Project Cars 2.  Then in the Z1 Analyzer Live Telemetry tab make sure the Madness Engine option is checked and set the drop down to Automobilista 2.

* Dirt Rally 2 is now officially supported.  To connect to this sim you will need to edit the file 'hardware_settings_config'. This file is located in Documents\My Games\Dirt Rally 2.0\hardwaresettings.  We suggest using Notepad for this.  Open the file in Notepad and set the udp entry line to: <udp enabled="true" extradata="3" ip="127.0.0.1" port="20777" delay="2" />

Then in the Z1 Analyzer Live Telemetry tab make sure the Codemasters option is checked and set the drop down to Dirt Rally 2. The Z1 Analyzer connects to the sim when you are in the car and press the handbrake before the session starts. This is because of the way in which DR2 sends out data.

* Project Cars 3 is now officially supported.  To connect to this sim, select Project Cars 3 from the Madness Engine drop down in Z1 Analyzer's Live Telemetry tab.  In the sim set the shared memory option to Project Cars 2, and set the UDP Mode to Off.

Download the demo today:
https://z1simwheel.com/dashboard/demo.cfm
101
Plugins / Z1 Designer
March 30, 2021, 06:50:45 PM
We have just released the initial version (2021.1) of the Z1 Designer.  This new application allows users of the Z1 Dashboard to create their own dashboards.  Once created, if you share your designs any other user of the Z1 Dashboard can use the design as well.

The Z1 Designer is a free application and can be downloaded here:
https://z1simwheel.com/dashboard/demo.cfm


-- THE BASICS
The Z1 Designer lets you create your own dashboards for use with the Z1 Dashboard.  A dashboard created in the Z1 Designer requires the same version or higher of the Z1 Dashboard to run. So dashboards created in version 2021.1 of the Z1 Designer will need version 2021.1 or higher of the Z1 Dashboard to run.

Each dashboard currently consists of two files - an XML definition file and a PNG preview image file.  Both of these files are placed inside a single folder. This folder should have the same name as the Dashboard.  So if you name your dashboard 'My Dashboard', then the folder containing that dashboard's files will be called 'My Dashboard'.  The Z1 Designer will create these files and folder automatically when you create a new dashboard.

For a custom dashboard to be available to the Z1 Dashboard its folder should be placed inside the 'Dashboards' folder located inside documents/Z1Dashboard.  So with our above example called 'My Dashboard' the folder structure would be 'documents/z1dashboard/dashboards/my dashboard'.  The Z1 Designer will place any newly created Dashboards in this location by default.

All custom dashboards available to the Z1 Dashboard will be displayed at the bottom of the Car 2 tab's dashboard drop down.


-- CREATING NEW DASHBOARDS / OPENING DASHBOARDS
After starting the Z1 Designer you need to either Create a new dashboard (File->New Dashboard), or open an previously created dashboard (File->Open Dashboard).  There is a sample dashboard provided with version 2021.1 of the Z1 Dashboard.  To open this sample dashboard (or any other dashboard) you need to select the 'Dashboard' XML file within its containing folder.  To open the sample dashboard select the Dashboard XML file located in 'documents/z1dashboard/dashboards/Sample Dashboard'.


-- DASHBOARD LAYOUT
All dashboards are separated into two main layers: Background and Foreground.  The Background layer is drawn once when the dashboard is created.  The Foreground layer is drawn every time the Z1 Dashboard redraws.  You should place objects in the appropriate layer when creating your dashboards.  Objects that do not change should be placed in the background.  Objects that could change (such as data channels, shift lights, warnings, etc) should be placed in the foreground.


-- Z1 DESIGNER WINDOWS
There are 7 windows within the Z1 Designer that you will use to create your dashboard.  They are explained below.

You can move any window by dragging its title bar.  You can resize any window by dragging its lower right corner.  All windows have a minimum size, which they can't be resized below.  The Dashboard Properties, Dashboard Defaults and Dashboard Shift Lights windows can be closed by clicking on the X in the top right corner.  The other windows cannot be closed.  You can display any window by choosing it from the 'Windows' main menu.


-- DASHBOARD WINDOW
This is where your dashboard design is displayed.  The dashboard is displayed here exactly as it will appear within the Z1 Dashboard.  Resizing this window has the same effect as resizing the Z1 Dashboard.  This allows you to see what your Dashboard will look like at different resolutions.


-- TOOL BAR WINDOW
This window displays all available tools.  The pointer tool lets you select an object, move it, or resize it. To select an object simply click on it with the pointer. If multiple objects are located in the same place then the one which is 'on top' will be selected.  Once an object is selected you can move it by clicking on it and dragging it to the desired location.  You can resize a selected object by clicking and dragging on of the displayed resize handles. (To select objects that are underneath other objects, select that object's name in the Layers window.)


The other tools let you add various objects to your dashboard.  If you hover the mouse over a tool its function will be displayed.  The currently available objects to be added are: Rectangle, Rounded rectangle, Ellipse, Line, Multi-Line, Text, Data channel, Warning, Shift Light, Units, Graph, and Widget.  Any newly created object will be placed in the currently active layer.  (See the Layer Window section for more information.)

To add any object, select the tool, then click on the Dashboard where you want the object to appear and drag to the right and down to expand the size of the object.  It does not matter if you get the size and placement exactly correct as you can move and resize the object at any time.  The multi-line tool will add a new line segment every time you use the left mouse button. To end the multi-line object double click the mouse.

'Data Channel' - this displays a specific car data channel, such as gear, RPM, oil temp, etc.  Note that data channels associated with user selectable units, like temperatures, will be displayed in the units specified by the user of the Z1 Dashboard when run in the Z1 Dashboard.

'Units' let you display certain units, such as temperature, in the units selected by the user of the Z1 Dashboard.  So if you place a units object that is defined to show temperature, it will show 'C' if the user displays temperature in metric units, and 'F' if the user displays them in imperial units.

'Text' - This lets you define a rectangle within which you can display text. Once you create the text rectangle, use the Object Properties window to specify the text to be displayed.

'LED' - This lets you place an LED.  There can be up to 15 shift light LEDs and 6 warning LEDs. Each LED can have its own On and Off colors.  There is a checkbox within the Shift Lights Properties window that lets you turn the LED on or off to see what it looks like on both configurations. Note this setting has no effect on the Z1 Dashboard, it is only for designing purposes within the Z1 Designer.

'Graph' - This lets you display a data channel as a graph.  This is useful for displaying rev counter bars, or brake bias bars, etc. You specify the direction the bar should move in (left to right, right to left, etc).  You also specify the data channel associated with it and the minimum and maximum values for that channel.

A 'Warning' object lets you group objects together that are only displayed if the warning criteria is met.  For example the pit limiter, or a high oil temperature.  A warning object can contain any other type of object except another warning object.

'Widget' - This lets you display various items, or widgets, on your dashboard.  Example of these are the lap time, delta time, lap counter, etc.

We suggest playing around with these various tools to see what they do.


-- LAYERS WINDOW
This displays all the objects contained on the background and foreground layers.  You can use the scroll bar to move up or down the list if necessary.  As mentioned before objects that never change can be placed in the background layer.  Objects that could change should be placed in the foreground layer.  To set the background as the active layer, click 'Background' in the layers window.  To set the foreground as the active layer, click 'Foreground' in the layers window.  The currently active layer will be highlighted and have the word 'active' displayed in its header.  All new objects are placed on to the currently active layer (either background or foreground).


If you click on the name of an object in the layers window that object will become selected.  This allows you to interact with, move and resize objects that are underneath other objects.

The checkboxes on the right side of the layers window allow you to toggle the display of an object on or off.  This is intended to make designing your dashboard easier. You may have objects, such as warnings, that you do not need to see all the time when designing your dashboard.  Or you may just want to temporarily hide some objects to make it easier to work with other objects.  Note the hidden/visible status of an object has no effect on how it is displayed within the Z1 Dashboard.


-- OBJECT PROPERTIES WINDOW
This window displays the properties for the currently selected object in the Dashboard window.  The display will change based on what type of object is selected.  You can make changes to the currently selected object here as desired.


-- DASHBOARD PROPERTIES WINDOW
This window displays high level dashboard properties.  You can change the dashboard's name, background color and preview image here. The preview image is what gets displayed in the Z1 Dashboard in the Car 2 tab when the user is selecting a dashboard.


-- DASHBOARD SHIFT LIGHTS WINDOW
This window displays the options for setting when the shift lights illuminate within your dashboard.  If your dashboard does not contain shift lights then you can ignore this window. You can either enter specific RPMs for each shift light illumination, or select an option for them to be automatically turned on at certain RPM values. The drop down on the top right lets you choose this. (Note a user of your dashboard can always override these options.  What you are entering here is just the default options for your dashboard's shift lights.)


All gears can use the same RPM shift values, or you can specify unique shift values for each gear.  There is a checkbox at the top left that lets you toggle this feature on/off.


-- DASHBOARD DEFAULTS
This window shows various default values that are used when creating the dashboard.  The end user on the Z1 Dashboard can adjust these values if they choose.


The Z1 Designer is a free application and can be downloaded here:
https://z1simwheel.com/dashboard/demo.cfm
102
Plugins / Re: Z1 Dashboard Software
March 30, 2021, 12:42:24 AM
Version 2021.1 of the Z1 Dashboard is now available!

This new version brings some big changes:

The new Z1 Designer lets you create your own dashboards for use with the Z1 Dashboard


Compatibility with Dirt Rally 2


Compatibility with Automobilista 2


Compatibility with Project Cars 3


19 New Data Channels are now recorded by the Z1 Dashboard


Browser Streaming (previously web streaming) is now easier to use than ever.


New users can get the demo here:
https://z1simwheel.com/dashboard/demo.cfm

Existing users can get the update here:
https://z1simwheel.com/dashboard/MyDashboard.cfm

Here is the full list of release notes:
* Custom Dashboards: You can now create your own dashboards.  Please see the release notes for the Z1 Designer v2021.1 for details.

* Automobilista 2 is now officially supported.  To connect to this sim turn on the Shared Memory option within Automobilista 2, and set it to Project Cars 2.  Then in the Z1 Dashboard Network tab make sure the Madness Engine option is checked and set the drop down to Automobilista 2.

* Dirt Rally 2 is now officially supported.  To connect to this sim you will need to edit the file 'hardware_settings_config'. This file is located in Documents\My Games\Dirt Rally 2.0\hardwaresettings.  We suggest using Notepad for this.  Open the file in Notepad and set the udp entry line to: <udp enabled="true" extradata="3" ip="127.0.0.1" port="20777" delay="2" />

Then in the Z1 Dashboard Network tab make sure the Codemasters option is checked and set the drop down to Dirt Rally 2.  Note this sim lacks a lot of data provided by other sims.  There is no data on competitors.  See this page to see what data is available for the car: https://z1simwheel.com/analyzer/channels.cfm

The Z1 Dashboard connects to the sim when you are in the car and press the handbrake before the session starts. This is because of the way in which DR2 sends out data.

* Project Cars 3 is now officially supported.  You can use either the Shared Memory or UDP option.  To connect to this sim, select either Project Cars 3 or Project Cars 3 UDP from the Madness Engine drop down in Z1 Dashboard's Network tab.  In the sim if you are using shared memory, set the shared memory option to Project Cars 2, and set the UDP Mode to Off.  If you are using UDP, then set the UDP Mode to 1 and the UDP Protocol Version to Project Cars 2, and set the Shared Memory option to No.

* Browser streaming:  This feature has been renamed to 'Browser Streaming'.  In previous versions it was called 'Web Streaming'.  We believe the new name is more inline with that the feature actually does, which is to stream the Z1 Dashboard to a browser.  In addition when this feature is activated a message will appear on the 'Waiting For Connection' screen letting you know it is active, and what address the browser should be set to. This makes it easier to ensure you have the correct URL entered into your browser.

* New Data Channels: Wheel lateral patch velocity, Wheel longitudinal patch velocity, Wheel lateral ground velocity, Wheel longitudinal ground velocity, Wheel toe, Velocity X, Velocity Y, Velocity Z, Brake Bias, ABS Setting, Traction Control 1 Setting, Traction Control 2 Setting, Front Anti-Roll Bar, Rear Anti-Roll Bar, Left Weight Jacker, Right Weight Jacker, Differential Entry, Differential Middle and Differential Exit are now recorded for the sims that supply them.  See this page for which sims supports these new data channels: https://z1simwheel.com/analyzer/channels.cfm

* There is now an option to specify how driver names are displayed. The two choices are 'First Last' and 'Last, First'. This is available in the Display settings tab.  This option effects all lists of drivers and the track maps.

* The Show Flags option has been updated.  It now lets you choose between showing, blue flags, yellow flags, both blue and yellow flags, or no flags.  This is a car specified option located in the Car 1 tab.

* The screen that displays in-car adjustments (brake bias, traction control, etc), will now flash its border for all events that would cause the standard dashboard background to flash. (This would be events like hitting redline, shift points, blue flags, etc.)

Download the demo today:
https://z1simwheel.com/dashboard/demo.cfm
103
Plugins / Re: Z1 Dashboard Software
March 26, 2021, 03:51:12 AM
Here is round 3 of Porsche's PCA Sim racing series.  This time it is at Road America.  The event is sponsored by the Z1 Dashboard software.


You can download the Z1 Dashboard here:
https://z1simwheel.com/dashboard/demo.cfm
104
Plugins / Re: Z1 Analyzer
March 19, 2021, 03:32:27 AM
Here's round 2 of the PCA Sim racing series.  This one is at Sonoma raceway.  The event is sponsored by the Z1 Analyzer.

You can download the Z1 Analyzer here: https://z1simwheel.com/dashboard/demo.cfm
105
Plugins / Re: Z1 Dashboard Software
March 09, 2021, 04:33:18 AM
We are extremely excited to have the Z1 Dashboard and Z1 Analyzer sponsoring the Porsche Club of America (PCA) Sim Racing Challenge series this year.  You can check out the race below (skip to about 9:45 to get to the start of the broadcast).

Thanks to everyone who participated in the race, as well as the commentators and everyone behind the scenes who makes these great events possible.


You can download the demo of the Z1 software here:
https://z1simwheel.com/dashboard/demo.cfm